19 March 2026 | Notice Board Company UK Ltd
Installing New Notice Boards on Existing Posts: A Practical Guide
Replacing an old notice board doesn’t always mean starting from scratch. In many cases, existing posts are perfectly serviceable and can be reused — saving time, money, and disruption. Rail-mounted notice boards offer a flexible solution, allowing customers to install new boards onto their current posts using the correct clips and fixings.
This guide explains how rail-mounted notice boards work, what to check before ordering, and what customers should look out for to ensure a smooth installation.
Why Use Rail-Mounted Notice Boards?
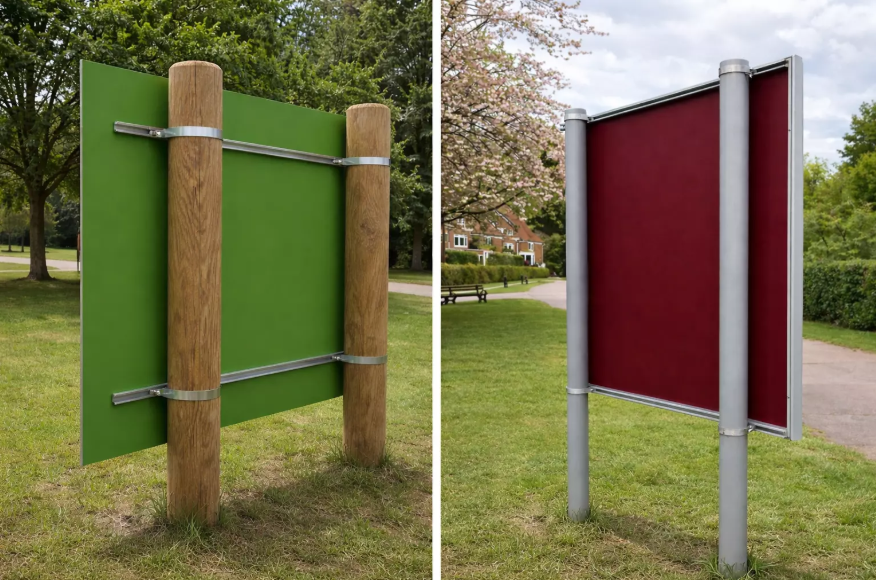
Rail-mounted notice boards are designed with horizontal rails on the rear of the board. These rails allow the board to be fixed to posts using specialist clips rather than being drilled directly into the structure.
Key benefits include:
No need to replace existing posts
Faster installation with minimal groundwork
Flexibility to adjust height and alignment
Reduced risk of damaging the notice board frame
This approach is especially popular for schools, councils, parish boards, and commercial sites where posts are already concreted in place.
What to Check Before Installing on Existing Posts
Before ordering a new notice board, it’s important to assess the existing posts carefully. Not all posts are the same, and compatibility is key.
1. Post Material
Identify what the posts are made from:
Steel or aluminium posts – usually ideal for clip mounting
Timber posts – may still work, but condition is critical
Concrete posts – require specialist clips and adequate access
Ensure the posts are structurally sound, free from excessive rust, rot, or cracking.
2. Post Size and Profile
Rail clips must match the post dimensions.
Measure:
Width and depth (for square or rectangular posts)
Diameter (for round posts)
Distance between posts (to ensure board width is suitable)
Providing accurate post measurements allows the correct clips to be supplied and avoids site delays.
3. Post Spacing
Check the centre-to-centre distance between posts. The notice board rails must align with the posts without overhang or excessive stress on the fixings.
If posts are slightly wider or narrower than standard spacing, rail-mounted systems can often accommodate this — but it’s important to confirm in advance.
4. Height and Accessibility
Decide:
The finished height of the notice board
Whether it needs to meet accessibility or visibility requirements
If adjustments are required compared to the previous board
Rail systems make height adjustment easier, but planning ahead avoids rework.
Using the Correct Clips and Fixings
Rail-mounted boards rely on purpose-designed clips that wrap around or fix to the post and secure the board rails.
Things to consider:
Clip material (stainless steel, galvanised steel, or coated)
Suitability for outdoor use and local conditions
Compatibility with post shape and size
Whether anti-tamper fixings are required
Using the correct clips ensures the board is secure, level, and resistant to vandalism or weather damage.
Installation Tips for Best Results
Always check posts are vertical and aligned before fitting
Dry-fit the board and clips before final tightening
Use a spirit level to ensure the board is straight
Follow torque recommendations to avoid crushing rails or posts
If posts are old, consider load limits and wind exposure
For larger boards or exposed locations, professional installation may be recommended.
When Existing Posts May Not Be Suitable
While many posts can be reused, replacement may be necessary if:
Posts are loose or unstable
Severe corrosion or rot is present
Spacing is incompatible with the new board
Posts are too short for the desired board height
A quick site check can usually confirm suitability.
A Flexible, Cost-Effective Solution
Rail-mounted notice boards offer an efficient way to upgrade signage without unnecessary groundwork. By checking post condition, size, and spacing in advance — and using the correct clips — customers can achieve a secure, professional installation with minimal disruption.
If you’re unsure about compatibility, providing post measurements and photos can help ensure the right solution is supplied first time.